Vinyl Crafting Delight: Exploring the World of Graphic Cutting

Vinyl Crafting Delight: Exploring the World of Graphic Cutting

Sino Group is a professional adhesive vinyl film manufacturer and wholesale supplier, kindly get factory price of: graphic cutting vinyl, diy craft vinyl, vinyl transfer tape, self adhesive vinyl film, printing vinyl, adhesive vinyl materials

Share This Post

Understanding the Basics of Graphic Cutting Vinyl

The Basics of Graphic Cutting Vinyl refer to the fundamental concepts and techniques involved in using vinyl cutting machines to create custom designs, stickers, decals, and other graphical elements. Vinyl cutting is a popular method in the crafting and DIY communities, as well as in commercial settings like sign making and promotional materials.

Here’s an explanation of the key aspects of the Basics of Graphic Cutting Vinyl:
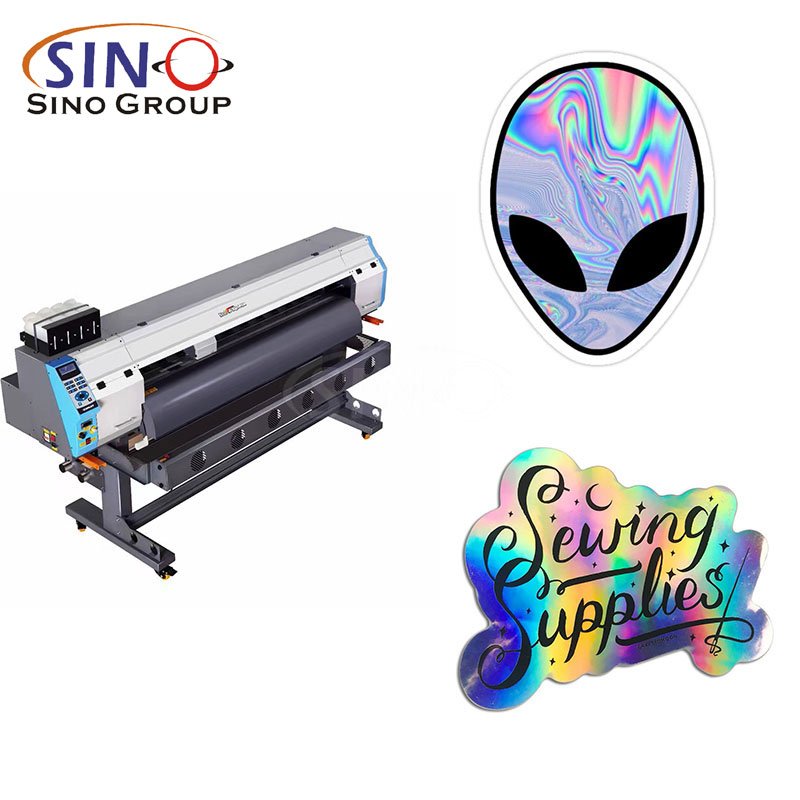
1. Vinyl Materials

Graphic cutting vinyl is a thin, flexible, and adhesive-backed material available in various colors and finishes. It comes in rolls or sheets and is designed to be compatible with cutting machines.

2. Cutting Machines

To cut the vinyl precisely, you need a vinyl cutting machine (also known as a vinyl cutter or plotter). These machines are equipped with sharp blades that follow the vector paths of your design to cut the vinyl into the desired shape.

3. Design Software

Before cutting, you create your designs using graphic design software such as Adobe Illustrator, CorelDRAW, or specialized vinyl cutting software. The design is then saved in a format compatible with the cutting machine (usually SVG or DXF).

4. Vector Graphics

Graphic cutting machines work with vector graphics, which are based on mathematical equations. Unlike raster images (JPEG, PNG, etc.), vector graphics retain their quality and sharpness at any size.

5. Preparation

To start the cutting process, you load the vinyl roll or sheet into the cutter and secure it properly. You also need to calibrate the machine to ensure precise cutting.

6. Cutting Settings

Adjusting the cutting settings is essential to ensure the vinyl is cut correctly. Factors like the type and thickness of the vinyl, blade depth, and cutting speed need to be optimized.
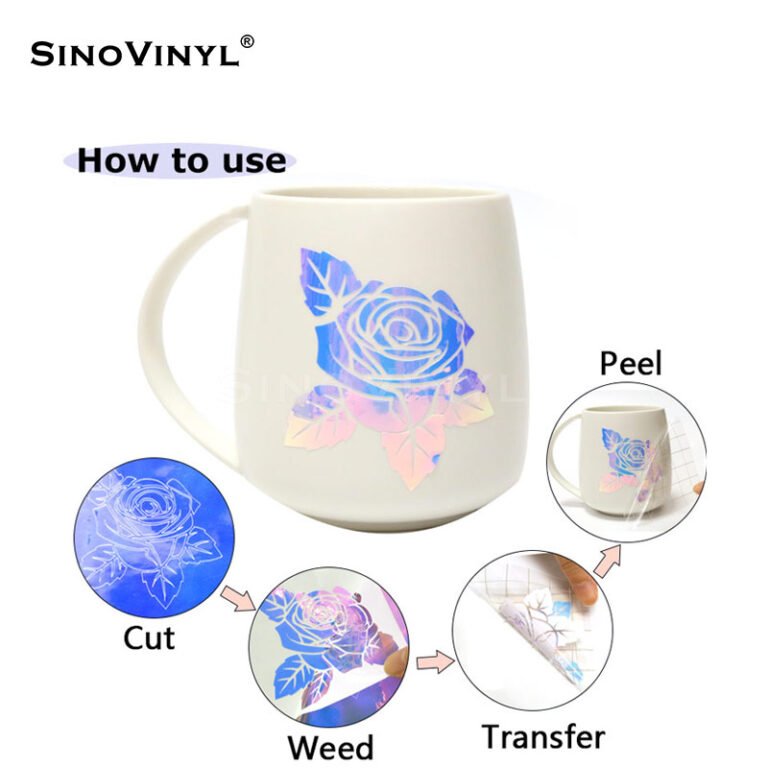
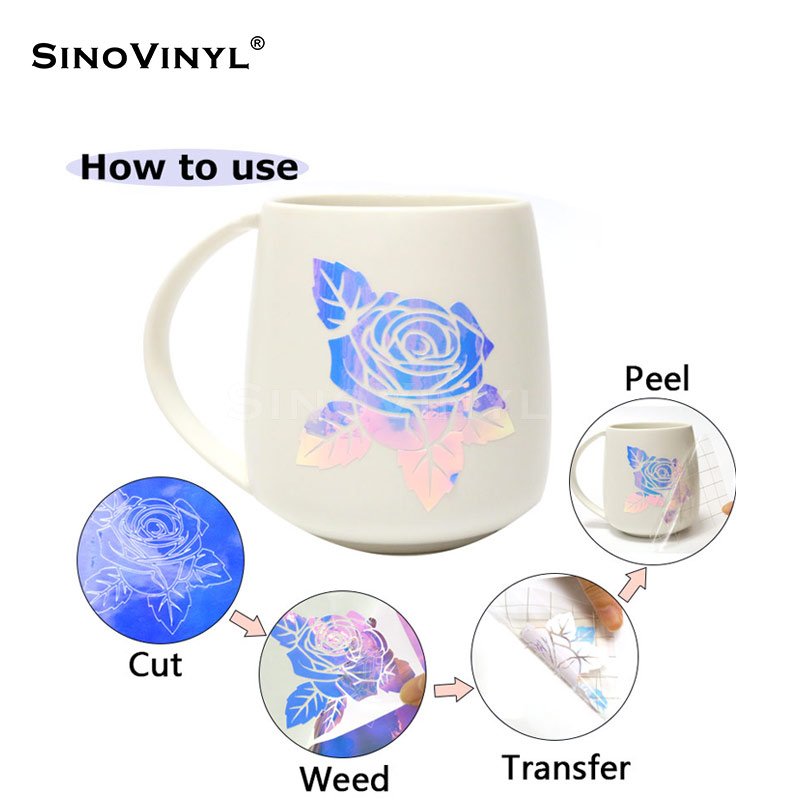
7. Weeding

Once the vinyl is cut, you need to remove the excess material from the backing sheet. This process is called weeding, and it requires precision to avoid damaging the delicate parts of the design.

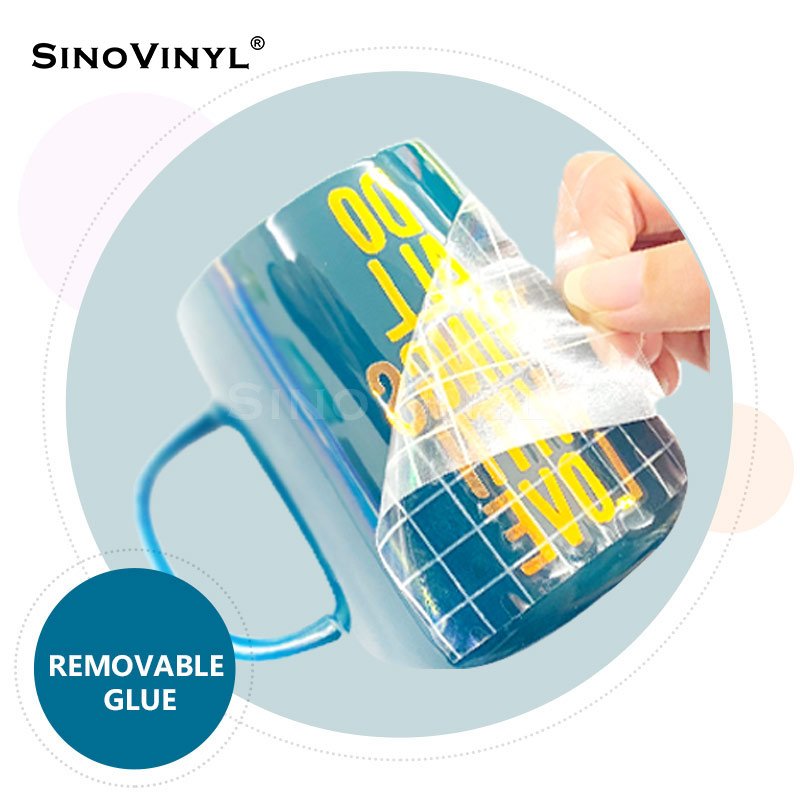
8. Transfer Tape/Application Tape

After weeding, you use transfer tape (or application tape) to lift the design off the backing sheet and transfer it to the desired surface.

9. Application

Finally, you carefully apply the vinyl design to various surfaces, such as walls, windows, vehicles, clothing, and more. Proper application techniques ensure a smooth and bubble-free finish.

10. Practice and Patience

Graphic cutting vinyl may seem intimidating at first, but with practice and patience, you can achieve impressive results. Learning to troubleshoot common issues and refine your skills is part of the learning process.

Understanding the basics of graphic cutting vinyl sets a solid foundation for exploring more advanced techniques and projects. It allows you to unleash your creativity and turn your ideas into tangible, customized creations.

Step-by-Step Guide to Creating Vinyl Decals with Graphic Cutting

Creating vinyl decals with graphic cutting can be a fun and rewarding craft project. Here’s a step-by-step guide to help you get started:

Step 1: Gather Your Materials

– Graphic cutting vinyl in the colors of your choice
– A vinyl cutting machine (such as a or Silhouette)
– Weeding tools (small tweezers or a weeding pick)
– Transfer tape or transfer paper
– Scissors
– A clean and smooth surface to apply the decal (e.g., glass, plastic, or wood)

Step 2: Design Your Decal

– Open your preferred graphic design software or use the design software that comes with your vinyl cutting machine.
– Create or import the design you want to turn into a decal. Keep in mind that intricate designs may be more challenging to work with, especially for beginners.
– Ensure your design fits within the cutting area of your vinyl cutting machine.

Step 3: Load and Cut the Vinyl

– Prepare your cutting machine by loading the vinyl onto the cutting mat.
– Follow the instructions for setting up the machine and loading the design.
– Choose the appropriate settings (e.g., vinyl type, blade depth) for cutting the vinyl.
– Initiate the cutting process, and wait for the machine to complete the cut.

Step 4: Weed the Vinyl

– Carefully remove the vinyl from the cutting mat.
– Use the weeding tools to remove the excess vinyl around your design. This process is called weeding.
– Be patient and take your time, especially with intricate designs.

Step 5: Apply Transfer Tape

– Cut a piece of transfer tape slightly larger than your design.
– Peel the backing off the transfer tape and carefully apply it over your vinyl design.
– Use a scraper tool or a credit card to firmly press the transfer tape onto the vinyl, ensuring it adheres well.

Step 6: Transfer the Decal

– Position the transfer tape with the vinyl decal onto your desired surface.
– Gently press down the transfer tape to adhere the vinyl to the surface.
– Use the scraper tool or credit card to smooth out any bubbles and ensure proper adhesion.

Step 7: Peel off the Transfer Tape

– Slowly and carefully peel back the transfer tape at a 45-degree angle. Ensure the vinyl stays adhered to the surface.
– If any part of the vinyl starts to lift with the transfer tape, press it back down and use the scraper tool again.

Step 8: Finishing Touches

– Once the transfer tape is completely removed, inspect the decal for any bubbles or imperfections.
– Gently smooth out any issues with your fingers or the scraper tool.

Congratulations! You’ve successfully created a vinyl decal with graphic cutting. Now, you can apply this technique to create more decals for various projects, gifts, or even start a small vinyl crafting business. Remember, practice makes perfect, so don’t hesitate to experiment with different designs and materials to expand your vinyl cutting skills.

Final Words

In conclusion, exploring the world of graphic cutting vinyl has undoubtedly unlocked a world of crafting delight. From personalized home decor to eye-catching signage and unique gifts, this versatile medium empowers your creativity and allows you to bring your imaginative visions to life. As you delve into this art form, remember that practice and patience are key to mastering the techniques. Embrace the learning process, and don’t be afraid to experiment with designs and materials. With the right tools and a touch of ingenuity, you’ll find yourself amazed at the endless possibilities that graphic cutting vinyl offers.

Professional Adhesive Vinyl Material Supplier

  1. Leading manufacturer in China
  2. 10+ years experience produced adhesive vinyls
  3. Over 30+ series and 500+ colors
  4. Free sample swatches supply
  5. Flexible OEM & ODM design
  6. Quality control and stability
  7. Reasonable price and fast delivery
  8. Premium customer service

Our Happy Customer

what our clients have to say

Please Leave Your Information

We would be happy to hear you and learn all about you.

*We respect your confidentiality and all information is protected.

Graphic Cutting Vinyl FAQ

The normal size is 12×12″/ 30.5×30.5CM, 12×60″/30.5x152CM, 0.61x50M/24″x163FT, 1.22x50M/60″x163FT, we can make customize size and brand.

The  SINOVINYL® graphic cutting vinyl with 6 advantages:
1. Removable:

When you stick on the wall, glass or any other smooth surface, you can remove it any time, and without the glue leave on the surface.

2. Friendly materials:

The SINOVINYL® graphic cutting vinyl raw material made by PVC and solvent glue, no smell, no formaldehyde.

3. Long durability:

Use for outdoor 2-3 years, for indoor up to 5 years.

4. Easy to application:

SINOVINYL® graphic cutting vinyl is easy for cricut vinyl cutter plotter, easy to cut and application on the wall, glass or any other smooth surface.

5. Multi colors:

With more than 100+ colors, super gloss and super matte surface.

6. Versatile widely use:

SINOVINYL® graphic cutting vinyl can be use for vinyl cutting plotter, letters and patterns cutting, outdoor and indoor graphic poster sign, wall and glass decoration, home decor, furniture, car decal sticker etc.

Commonly used are drug labels, food labels, shampoo labels, barcodes, battery labels, outer box labels, product labels, semi-finished products labels, temporary labels, home wall decoration labels, wall stickers, furniture labels Stickers, advertising decoration labels, computer lettering labels, outdoor decoration labels, packaging equipment labels, etc.

Film stickers are mainly used for decorative decals on cars and motorcycles, logo characters on shopping malls, reflective films on highways, and markings on containers.

The common signs at the entrance of stores, road signs, and advertisements posted on the street in our lives are all instant stickers, which are characterized by their own adhesive on the back, which can be pasted or used with transfer film after uncovering the back paper.

The transfer film is an intermediate carrier that carries the printed or printed pattern. After the lettering is made, a layer of transfer film will be attached. A layer of chemical elastic film transferred to the printed article is used. Simple In other words, tear off the backing paper and transfer the pattern with transfer film to something, such as a glass door, and then tear off the transfer film to make the cutting vinyl neat and standard in the glass door, and the pattern will never be crooked or twisted. Unfair imagination.

How to correct use of vinyl transfer film:

1. Before starting to paste, please prepare some tools: scissors, knives, cards or bank cards. At first cut the excess vacancies around the pattern with scissors, so that you can compare and paste them.

2. Stick the transfer film on the pattern, and use a card or bank card to repeatedly scrape the transfer film back and forth to make the pattern and the transfer film stick together better, and there will be no bubbles after sticking to the wall;

3. If the wall powder falls off or the transfer film will be stuck together with the wall paint when the transfer film is torn off, please fix it before applying the wall sticker; peel off the transfer film with the pattern slightly from the bottom paper of the pattern, if the pattern has the center that is not stuck to the transfer film can be assisted with a knife. Before proceeding to step 4, first filter the leftover material cut from the transfer film to the wall of the corner to test the function of the wall, and then paste it after making sure that the wall is ok. When attaching a pattern with a large contrast area, the pattern can be reversed, and the bottom paper of the pattern can be peeled away from the transfer film and the pattern;

4. When you paste the pattern, you can first glue a corner of the transfer film to the wall, paste it on the selected position, and use a scratch card to smooth out the air bubbles between the wall sticker and the wall;

5. When tearing the transfer film away from the wall, try to be as slow as possible. You can tear off the transfer film while pressing the pattern, and definitely don’t tear off the pattern together.

How to use the vinyl transfer tape?

1. Why we need to choose the good quality cricut cutting diy craft vinyl of the release paper?

We use the cricut vinyl cutter plotter, the backing bood one side is with glue, we need to choose the release paper, avoid sticking to the pad.

How to choose the good quality self adhesive DIY craft vinyl on cricut plotter machine?


On the market has 3 types of the release paper,  PET release paper, double PE release paper, normal release paper.

Double PE release paper is similar as PET release paper, now we show you the difference of the Double PE and normal.

How to choose the good quality self adhesive DIY craft vinyl on cricut plotter machine?

So we need to choose the Double PE coating release paper cricut cutting diy craft vinyl.


2. How to differentiate the cricut cutting diy craft vinyl double PE coating release paper and the normal?

The Double PE coating release paper it feels smooth when touched by hand and shiny under light.
How to choose the good quality self adhesive DIY craft vinyl on cricut plotter machine?


3. How to choose the good quality of the cricut cutting diy craft vinyl?

To test with pure color pvc vinyl, you can stretch the cricut cutting vinyl by hand. Good quality vinyl has a certain degree of stretchability(the left of the picture). If it can easily break or become white after stretching, the quality of vinyl is not good(the right of the picture).


Now we know how to choose the right quality of the cricut diy craft cutting vinyl.

The price for diy craft vinyl is based on the vinyl types, for our diy craft vinyl items, the size 12×60″/0.305×1.52m, the price is from US2-US6 per roll.

Please contact us to get detaile offers.

How to use graphic cutting vinyl?

Computer designed images are loaded onto the vinyl cutter via cords or over wifi depending on the model. Then the vinyl is loaded into the machine where it is automatically fed through and cut to follow the set design.

The vinyl cutter uses a small knife to precisely cut the outline of figures into a sheet or piece of vinyl, but not the release liner. The knife moves side to side and turns, while the vinyl is moved beneath the knife. The results from the cut process is an image cut into the material.

  1. The material is then ‘weeded’ where the excess parts of the figures are removed from the release liner. It is possible to remove the positive parts, which would give a negative sticker, or remove the negative parts, giving a positive sticker. Removing the figure would be like removing the positive, giving a negative image of the figures.

A sheet of transfer tape with an adhesive backing is laid on the weeded vinyl. A roller is applied to the tape, causing it to adhere to the vinyl. The transfer tape and the weeded vinyl is pulled off the release liner, and applied to a substrate, such as a sheet of aluminium. This results in an aluminium sign with vinyl figures.

Get Started With SINOVINYL Now

Welcome to get adhesive vinyl materials offer and to be the distributor of SINOVINYL.

small_c_popup-1-1.png

Ask for Sample Now

small_c_popup-1.png

Ask for Quote Now

We Would Be Happy To Assist You

small_c_popup.png

Download Our Full Catalog

We Would Be Happy To Assist You